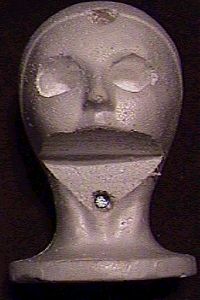
To build these heads, you will first need to cut the lower portion of
the head’s jaw off. Try and keep the lower portion intact because you
will be gluing it back onto the face once you apply the teeth.
The next step will be hollowing out the eye sockets to accept the
ping-pong balls. To do so I recommend using your finger or a
screwdriver and pry out the main area. Then with a heat gun, melt the
holes deep enough so the ping-pong balls stick in, but protrude just a
little out of the sockets. You may wish to have them stick way out or
really far in, but that’s entirely up to you and how you want the head
to look. Once the teeth have been securely mounted into the mouth
cavity remount the lower jaw to the head with hot glue or epoxy. If you
choose to have the mouth open, adhere a small piece of latex to each
cheek and lower jaw to simulate cheek tissue.
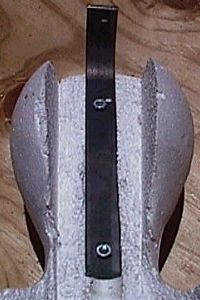
If you are using this ghost head in a stump jumper or any other prop
that requires it to be securely mounted, you will need to add a metal
brace. I have found that a 1” metal bar with an overall length of 12”
and a bend at 4”, inserted into the top of the head then refilled and
sealed with expandable foam works great.
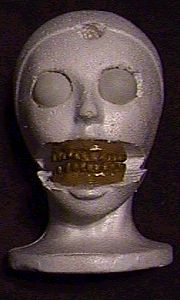
Once the eye sockets and reinforcement/mounting bar have been applied,
the next step is mounting the teeth into the mouth opening that you cut
earlier. To mount the teeth take your monster teeth and insert one set
to the top and the other to the bottom using hot glue or a fast drying
epoxy. Completely fill in the void inside the teeth so the glue pours
out of the top. This will remove all flexibility in the latex teeth and
reduce the possibility of the teeth bending and the paint chipping off.
Once the modeling clay is dry, ensure that the shrinkage has not
deformed your model. The Model Magic shrinks as it dries, so another
coat may be necessary, if this is the case, add another coat, then
allow the clay to dry for another 24 hours.
When the teeth and jaw are securely mounted, the next step is to mount
the ping-pong balls into the eye sockets. You can also mount LED’s
behind or inside the ping-pong balls to give it an added effect
especially if you want the eyes to glow in complete darkness, then a
blacklight turn on and expose the entire head. Once you have mounted
the LED’s and the ping-pong balls still fit, glue the balls into the
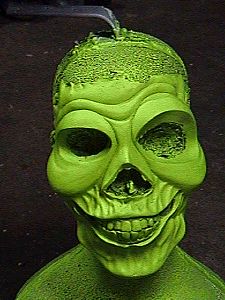
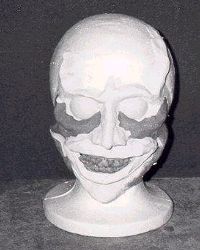
sockets with hot glue or a foam safe epoxy. Your ghost head should look
something like the picture to the right.
Once the eyes are in place, you will now mold in facial features
with
a light air drying modeling clay such as Crayola’s model magic. The
model magic is extremely easy to use, air dries to a hard finish and
remains very light, which is an added bonus if you and not mounting the
head down and you want this guy to stand up by itself. Mix up the clay
and begin sculpting in features such as laugh lines, evil eye brows,
lips, ears, or whatever other features you think your model needs. When
you are happy with how it looks, you will need to let the clay dry for
24 hours to a hard finish.
Now
that the clay is completely dry you are ready to begin applying coats
of latex to seal the clay and give the head a smooth look. It is
extremely important that your base clay is completely dry because if it
is not, your latex will be affected and runs the risk of not drying or
not bonding to the clay. Apply a minimum of 4 to 5 coats allowing the
latex to dry in between coats. You may also want to add a bit of cheese
cloth into the batch. This will strengthen the model as well as gives a
great corpse like texture if not fully saturated with latex.
Once
you’ve added the latex and it has dried for at least 24 hours, you are
ready to paint. To paint the head you have a multiple of choices to
make. If you are adding it to your
haunt in a black light scene, a simple coat of fluorescent paint may be
all you need. If it will be viewed in light other then UV, then more
detail may want to be added. Once you have made the choice for where
the head will be displayed and you have all your colors on hand, begin
with a base coat of your main color, and add in other colors and
details, until you are happy with the finished product. Personally, I
paint my ghost heads pure fluorescent yellow or with wildfire
transparent blue. I have added detail in the past, but either the
detail is un noticed due to the UV glow or the light seems to cast a
much more natural and realistic shadow then I have been able to
achieve. Also if you are using a black light on a pure fluorescent
head, added shadows may take away from the ghostly appearance and look
like globs of paint. Test its appearance between coats, a simple
coverage may be exactly what your shooting for.
Once
the paint is dry you are ready to mount the head into your prop or
cemetery scene, add a black light or spot light and your ready to go.
If you really like the way the head came out, I suggest making a mold,
so you can make a bunch more of them (refer to the gargoyle section of
the first DC Prop Builders Handbook). These guys really come in handy.
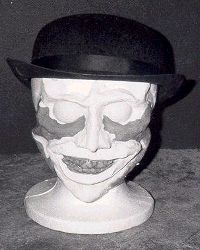
You may also wish to add other additions such as hair or a hat or other
minor life like additions. You may wish to also paint those the same
color as the face to maintain a ghostly appearance. Play around with
these, they are great simple additions to any cemetery scene.
This
how-to comes from the "DC Prop Builder's Handbook" series. Both books
combined feature over 30 different prop and scare designs to keep you
busy all year round. For more information on Devious Concoctions, or to
purchase either of the books, visit www.deviousconcoctions.com.